Custom Fields
Nearly every business has unique characteristics and unique pieces of data that need to be stored and tracked. SCP provides several tools to make it easy to do this, including leveraging "extra" fields on each entity, custom "settings" for many entities, and facilities to collect custom information from users. Here is a summary of the topics in this document:
Custom (Extra) Fields In the Customer InterfaceExtra Fields and Ecommerce OrdersProduct Catalog Extra Fields Saved With OrdersAdding Extra Fields for Orders To the Checkout ProcessAdding More Custom Fields for Orders To the Checkout ProcessCollecting More Customer Information Using AgreementsCustom Fields in the Administrator InterfaceChanging the Labels for FieldsChanging Labels for EntitiesSettings Entities for Custom InformationSettings as Custom Fields On the Parent Grid ScreenSettings Entities' Own Grid ScreensManaging the Drop Down Options for FieldsOther Tools for Customizing and Extending SCP
Custom (Extra) Fields In the Customer Interface
Many of the entities in the system, such as products, orders, suppliers, etc., have "extra" fields that you can use for whatever purpose you need in your business or workflow.
Out-of-box, the "extra" fields can be found on many forms, and they are simply named "Extra 1," "Extra 2," etc.

Extra Fields and Ecommerce Orders
Product Catalog Extra Fields Saved With Orders
The extra fields for Products, Attributes, and Options, have an added benefit: as a customer places an order, these extra fields will automatically be copied into the new Order Items and Order Item Attributes in the customer's cart. These values are then saved in the placed order and can be included in reports or exports.
| Product Catalog Field | Copied to Order Field |
|---|---|
| Product.extra1, extra2, etc. | OrderItem.extra1, extra2, etc |
| Attribute.extra1, extra2, etc. | OrderItemAttribute.attributeExtra1, attributeExtra2, etc. |
| Option.extra1, extra2, etc. | OrderItemAttribute.optionExtra1, optionExtra2, etc. |
Consider for example if your options have special part numbers that must be saved with the order in order for your team to efficiently fulfill the order. By uploading the part numbers into each option's extra1 field, for example, that piece of information will automatically get passed into the order and available for viewing or processing.
Adding Extra Fields for Orders To the Checkout Process
Administrators can also collect information from customers that the system will store in the Order's extra1, extra2, etc. fields. Prompts for the extra fields can be added to the first screen of the checkout - where the delivery address information is collected from the user. To enable this, go to the Settings -> Address Settings screen, and check off which extra fields you wish to collect from the user under the Prompted Delivery Address Fields setting:

In addition, you can check off the same field under the Required Delivery Address Fields setting, to indicate the user has to submit a value.
When you have selected one or more extra field to be prompted for on the addresses screen, customer will see the field appear and be prompted to enter something. You will almost certainly want to change the label for the field to something other than "Extra 1". To do this, add an Application Message under the Site Content -> Application Messages screen. For the Message Key, use "orderForm.deliveryExtra1", and for the Content, enter the label you wish to use for the field. In this example we are labelling the field "Emergency Contact Name":

The result of these changes on the checkout screen looks like this - the new extra field is showing up and being prompted for:

When the customer enters and submits a value for that field, it will be saved to the Order's extra1 field, where administrators can see it, export it, and so on.
Adding More Custom Fields for Orders To the Checkout Process
It is possible to add more than 5 custom fields to the checkout addresses form. Additional fields can be submitted using a generic parameter called "orderSettings". The system will save the names and values of these fields under the customer's order as Order Settings, which are viewable in the administrator. This is an advanced feature that may require knowledge of HTML and Javascript. To implement this feature, additional fields must be added to the #addressesForm form element on the checkout addresses tab of the checkout screen. Contact Us for more information.
Collecting More Customer Information Using Agreements
The above examples show how you can collect additional fields of information from customers during the checkout process, by adding fields to the Addresses tab of the checkout. It's worth noting, however, that you can also add an entirely new tab to the checkout process. The Agreements Feature essentially allows you to create your own dynamic form to the checkout, with whatever prompts and input elements you need.
Custom Fields in the Administrator Interface
Changing the Labels for Fields
To help identify the data, you can easily change the labels that are used throughout the administrator application for each field. This can be done not just for the "extra" fields, but any field under any entity in the system that you wish to relabel.
As an example, let's say your business's suppliers are medical practices, each of which might have one or two doctors in it. When you create a new Supplier record, you can collect and store each doctor's name in the "extra" fields. To help keep track of them, you can then relabel "Extra 1" as "Doctor 1" and "Extra 2" as "Doctor 2."

To do this, go to the Application Messages screen. To change the label for the supplier's Extra 1 field, create a new Application Message with a "key" of "AdminField.Supplier.extra1.displayName." For the "content" field, enter "Doctor 1" as the new name of the label.

You can make similar changes for other fields and entities. As another example, if you sell books, you might consider changing the "Name" field to "Title" for products. To do so, create a new Application Message with a "key" of "AdminField.Product.name.displayName" and "content" of "Title."
The new labels will show up pretty much everywhere in the administrator interface, making it easy to manage the custom data.Custom Fields and Entity Names in the Administrator Interface
Changing Labels for Entities
Your business might use different terminology than SCP does for the same or similar concepts. To avoid confusion, it's possible to change the labels used throughout the administrator for each entity (in addtion to the fields under each entity as described above).
For example, SCP has an entity we call Supplier. This is intended to identify the company that acts as the source of a product. In your business you might like to reuse the supplier concent to track medical practices, and so you might like to label them with the term Medical Practice. To avoid confusion, you can relabel Supplier as Medical Practice throughout the administrator application. To do this, simply create Application Messages with the following message keys:
| Message Key | Content |
|---|---|
| Breadcrumb.Supplier.list | Medical Practices |
| Breadcrumb.SupplierSetting.list | Medical Practice Settings |
| Breadcrumb.Suppliers.list | Medical Practices |
| Breadcrumb.Supplier | Medical Practice |
| administrator.addSupplier | Add Medical Practice |
| messages.quickAddSupplier | Medical Practice - Quick Add |
Note, the term "supplier" must still need to be used in more technical places, such as the Filter String fields for Reports. In general, most users will not need to worry about these cases.
Settings Entities for Custom Information
The "extra" fields described above are available for use on almost every entity in the system. Each entity provides five such extra fields that you can use however you wish.
Certain entities, such as products, orders, and so on, might require more than five custom fields. For these entities, SCP provides a child "setting" entity where any number of records containing custom information can be stored and used.
Settings as Custom Fields On the Parent Grid Screen
It's easy to start using settings entities in the Administrator Grid. You can add a setting as a column on the parent's grid screen by simply entering the "code" for the child setting into the bottom of the Displayed Columns popup. Click the column icon and go to the bottom of the popup, and simply type in the "code" for the new field or fields you wish to track.

The system will then create additional columns for the setting codes, and allow you to use the pencil icon to add and edit their values. Even if you have not created the settings records, entering a value in this way from the parent's grid screen will create the record for you, and if it already exists, edit it:

This represents a great way to extend the system to store and track information essential for your business.
Settings Entities' Own Grid Screens
Each Setting entity such as Product Settings, Category Settings, Order Settings, or the above Unit Service Log Settings, has their own grid screen as well. So in addition to maintaining them on their parent's grid screen, you can maintain them collectively on their own grid screen:

This allows you to leverage all the Administrator Grid features such as reports, filtering, sorting, and so on. For example, you can main them in bulk by downloading an export, making changes, and then importing them.
For more information on using the grid screens, visit the documentation on the Administrator Grid Screen features.
Managing the Drop Down Options for Fields
Many fields in the Administrator interface are restricted to a list of values, and they are shown to the employees using a drop-down menu. One example of this is the Order Attachment's Type field:
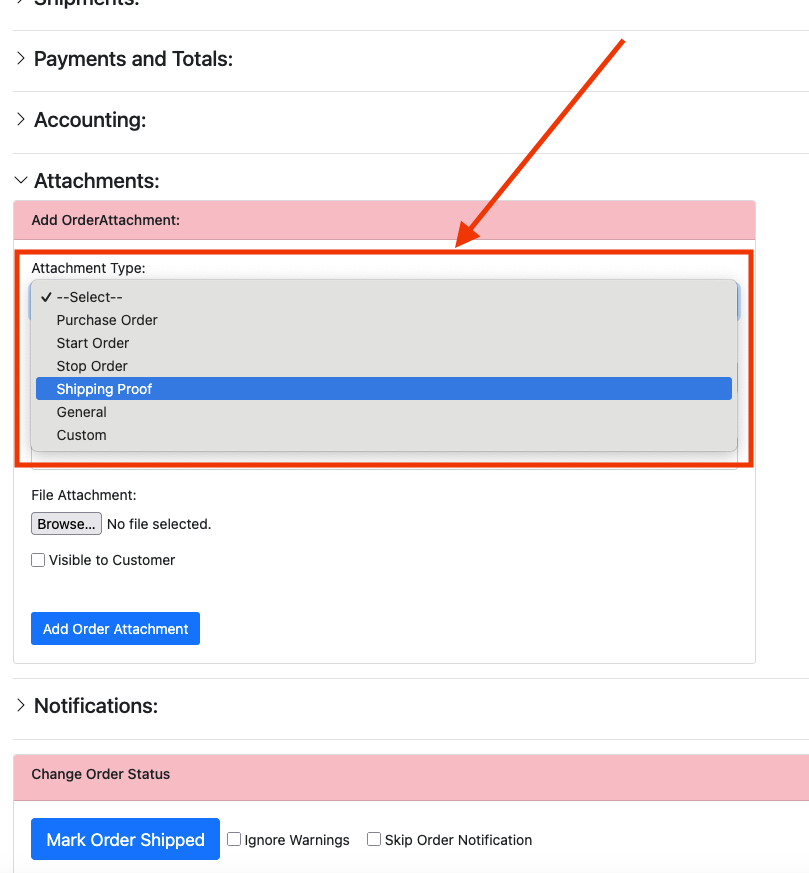
For many fields like these, you have the ability to change the list of options shown in the dropdown. This can help you customize the system to your workflow.
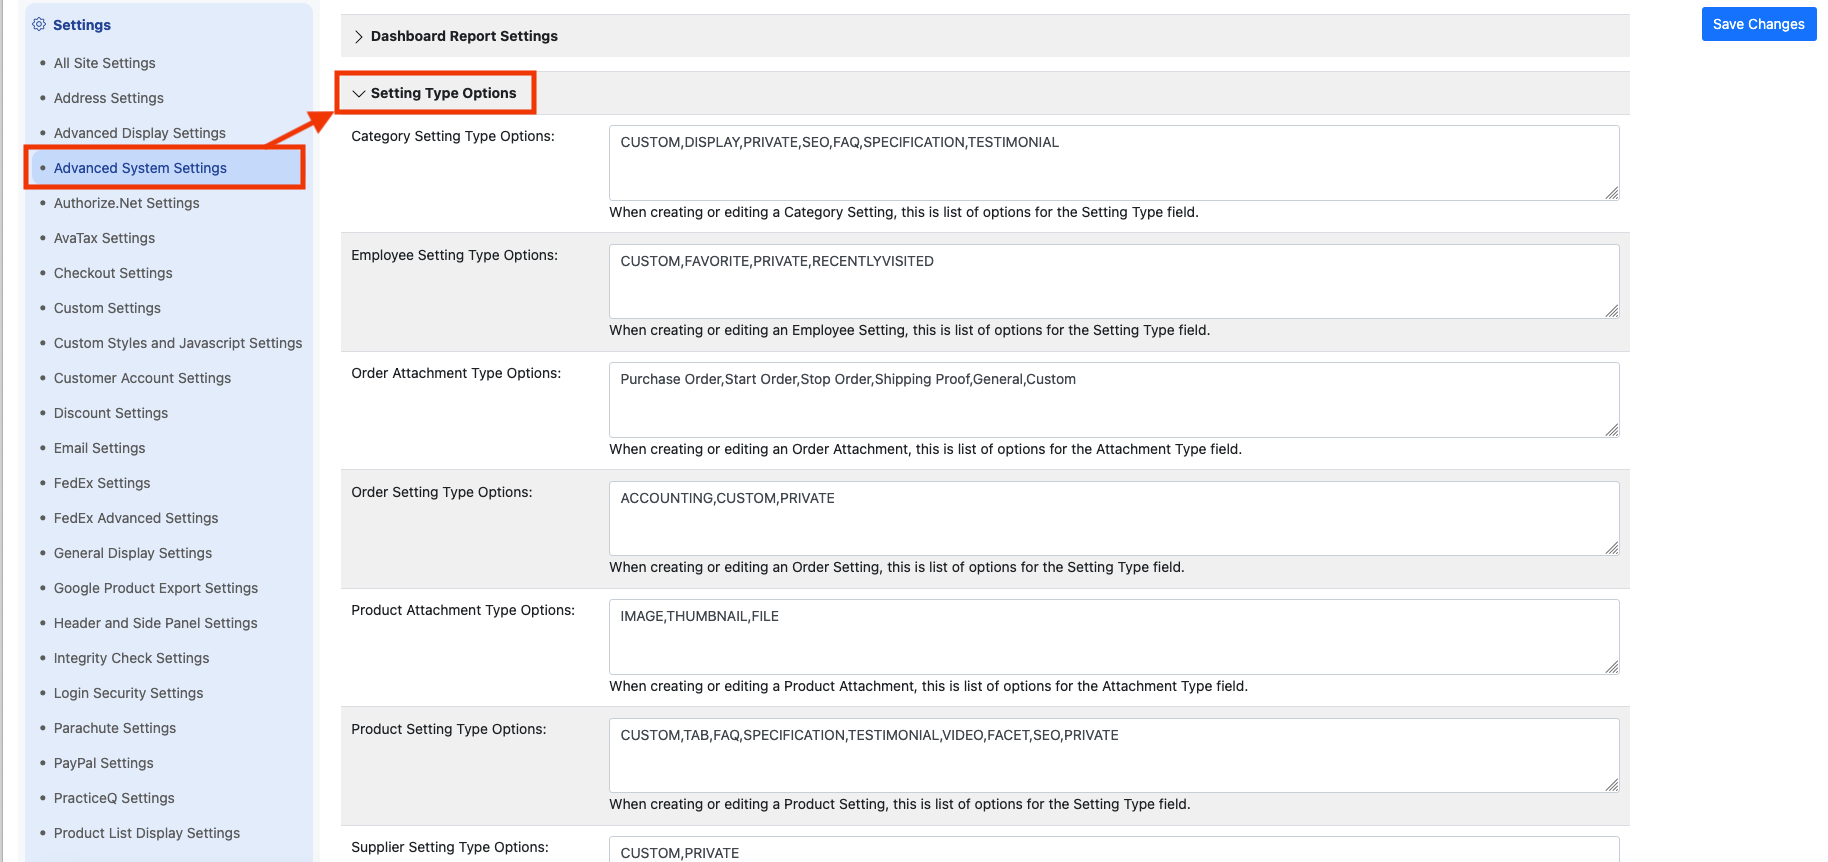
To manage the list of options shown in these sorts of dropdown menus in the Administrator, navigate to the Advanced System Settings screen. Under the "Setting Type Options" section you'll find settings allowing you to change many of the lists, including the above mentioned Order Attachment Type options:
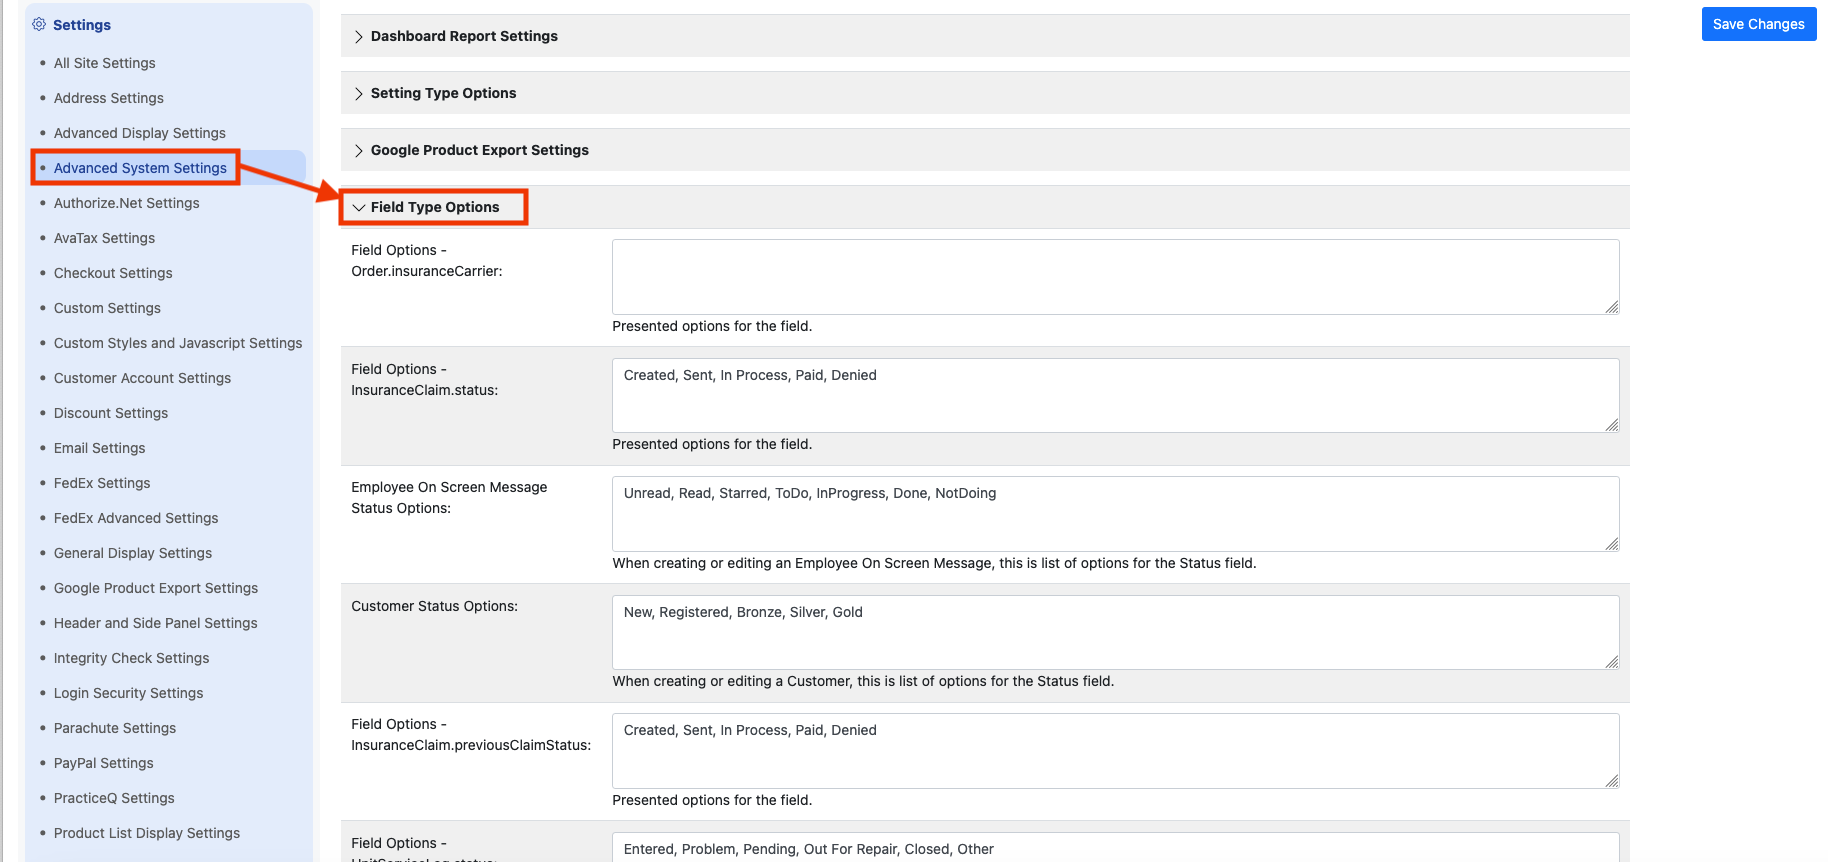
Additional lists are managed under the Field Type Options section:
If you don't see a setting for a field you wish to manage, you can actually create a new setting, in order to tell the system to show a dropdown menu to employees, instead of a free-form field. To do this, go to All Site Settings, and click the plus icon to add a new Site Setting. The code for the Site Setting must be in the form of "AdminField.entity-name.field-name.options", and the Setting Value must be a comma-separated list of all the possible options the employee can select. As an example, a Site Setting with a code of "AdminField.Customer.extra1.options" and a Setting Value of "1,2,3,4,5,6,7,8,9,10" will show employees a dropdown menu of the numbers from 1-10 for the Customer Extra1 field.
Note: one field that you cannot change in this fashion is the Order status field. The system maintains the list of possible order statuses, since they are used in numerous processes and features.
Other Tools for Customizing and Extending SCP
Custom Fields are just one tool available for customizing SCP for your business.
Extend the functions of SCP to meet your specific business needs, synchronize data with your existing systems, or create entirely new user interface applications with our API: API Documentation
Customize the out-of-the-box customer interface with your own templates and UI elements: Design (JSP) Customizations
Engage with us to develop your project! Find out more about SoftSlate's Services